First, invest in a 2GB SD card. Bigger ones will be SDHC (except for a few very uncommon 4GB and 8GB ones), and you will regret using a smaller one.
If you don't already use Linux get an USB card reader, VM software and some version of Linux, preferably one that can easily be installed as a functional text mode system if you're getting one just for this (like Debian in expert install mode and Ubuntu Server)…
Those distributions come with verbose USB notifications enabled by default, so you'll see a [sdb] Assuming drive cache: write through message as the card reader is found.
Get superuser privileges if you still didn't have them:sudo -s or su - depending on your configuration.
Start fdisk with fdisk /dev/sdb (assuming your card appears as sdb).
If you get a warning about DOS compatibility being deprecated, follow the instructions to disable it by typing c u.
Clear all partitions with o.
Create the boot partition by typing "new", primary, 1st partition; just press return to leave the default initial block and as the final one enter +70M to make it 70 MB long.
Primary partition 2 should be the root. I used +1710080 as a size in 512-blocks…
…and filled the remaining space with a 3rd partition for swap space. You really need some swap.
At this point, my partition table looked like this:
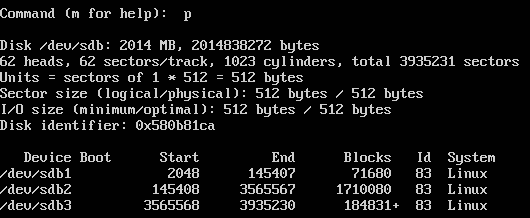
Use the t option to set the System ID of the first partition to FAT16(6) and the third one to Linux Swap(82).
w saves and quits.
Format the partitions: mkfs.vfat /dev/sdb1 ; mkfs.ext3 /dev/sdb2 ; mkswap /dev/sdb3.
Mount the partitions: mkdir -p /media/1 /media/2 && mount /dev/sdb1 /media/1 && mount /dev/sdb2 /media/2.
Install firmware using mkdir /media/1/bootmii && cp mikep1-armboot.bin /media/1/bootmii/armboot.bin
Pick a kernel image preconfigured for your video mode and install it with cp mikep5-zImage[…] /media/1/ppcboot.elf.
Extract the filesystem archive tar -C /media/2 -xjvf debian-lenny-5.0%2Bwhiite-1.10.tar.bz2. This should take under 3 minutes.
Remove the welcome message script, which causes issues on first boot: rm /media/2/etc/rc2.d/S99welcome
Use this /media/2/etc/network/interfaces template to set up your network.
Save this sources.list in /media/2/etc/apt/sources.list
cd / && umount /media/2 && umount /media/1, then put the SD card in your Wii and launch BootMii!
Watch the boot process carefully as you'll see your IP address listed in the DHCP output.
Connect via SSH to it with your home computer. Login as root:whiite.
apt-get update
apt-get install tar bzip2 apt dpkg — this is very important as you need a later version of dpkg that understands LZMA archives.
apt-get upgrade
Now you'll have to enable that swap partition, otherwise locale generation will fail: swapon /dev/mmcblk0p3 && locale-gen. This will significantly cut down on the number of error messages in dpkg output.
apt-get dist-upgrade
Open /etc/apt/sources.list and switch on the line for wheezy while removing the one for lenny. You may want to specify a more local mirror too.
apt-get update && apt-get install apt dpkg tar. Before agreeing, make sure xz-utils is going to be installed.
I now recommend to apt-get install aptitude. It's rather heavyweight, but it's THE package manager (and greatly simplifies a later command).
aptitude dist-upgrade. At the first Y/n/q confirmation prompt enter _hfsutils _fdutils _laptop-detect _powerpc-utils _bluez-cups _cups _fancontrol _lm-sensors to skip some mostly undesired packages with large dependencies. You will get a warning about "scripts missing LSB tags": just go ahead for now.
Two of those are locally created and don't do anything useful. rm /etc/init.d/libdevmapper1.02 /etc/init.d/mkswap.sh
The other ones actually belong to packages remove during these updates. aptitude purge \~c to fix.
dpkg-reconfigure sysv-rc and enable dependency-based boot sequencing.
Edit /etc/rc.local and add before the exit 0 line the following:
echo
echo -n "Creating SD card devices:"
mknod /dev/mmcblk0 b 179 0 && echo -n " mmcblk0"
mknod /dev/mmcblk0p1 b 179 1 && echo -n " mmcblk0p1"
mknod /dev/mmcblk0p2 b 179 2 && echo -n " mmcblk0p2"
mknod /dev/mmcblk0p3 b 179 3 && echo -n " mmcblk0p3"
chgrp disk /dev/mmcblk*
echo -n "."

echo
echo "Activating swap:"
swapon /dev/mmcblk0p3
This is a required kludge as the version of udev that gets installed doesn't create devices for the SD card. USB drives work fine and get the expected sda name.
Reclaim a good 10% of disk space: apt-get clean.
You can save even more space by going into the interactive aptitude menu and marking "obsolete packages", "libs" and "oldlibs" as autoinstalled (Shift+M) so that the useless one get removed.
reboot or hold the reset button for over 3 seconds (the message that gets printed to the console "rebooting in 3 seconds, press again to cancel" is misleading) and have fun…